Energy Efficient House
For the past two months, Ben, Olivia, Anthony and I have been working on this massive project. So far, it has been the longest project we have had in STEM this year! We had two goals. We needed to design a solar reflector panel to get light into the Northern Window of the STEM solar studio. We also had to design a cold frame to be used in San Marin's garden to allow plants to grow in the winter. There were nine main steps during this project.
1. Atomic Structure, State, and Heat
Here are some facts we learned about atomic structure, the transfer of heat, solids, liquids, and gases.
Atoms
~atoms are very abundant and very small
ex: there are 45,000,000,000,000,000,000 atoms in a sugar cube of air
~almost all mass in atoms are in the nucleus
nucleus-the center of an atom
~proton (+)
~neutron (-)
~electron (Ø)
compound- a type of molecule with different types of elements
molecule- multiple atoms bonded together
isotope- an atom with an unusual number of neutrons
ex: carbon 14
ion- an atom with an unusual number of electrons
ex: Na+, H+
Heat Transfer
~almost all of the earth's energy come from the sun
~the sun's energy travels 91 million miles through space
conduction- the transfer of heat through a solid
ex: a pan on a stove
convection- the transfer of heat through a liquid/gas
ex: the first and second floors of a house
radiation- the transfer of heat through waves/particles/rays
ex: sunlight
insulation- bad at conducting (opposite conduction) resistance to transferring heat
heat- a form of energy (thermal energy), also a measurement of the kinetic energy of atoms
unit- J (joules)
thermal conductivity- the rate at which a material transfers heat
thermal resistance- the ability of a material to resist transferring heat
evaporation- a cooling process
Solids, Liquids, and Gases
~heat is a measurement of the movement of molecules, which means the more heat there is, the more movement there will be
solid- all molecules are held in place
liquid- all molecules are bonding with each other but they can change bonds to flow
gas- molecules don't/can't have bonds with each other which takes up more space (less density)
2. Designing a Hot Water Heater
For the first part of this long project, we were to design a solar water heater. We built our heater using two shoe boxes, magazine papers, a water bottle, two beakers, a copper tube, a plastic tube, plastic wrap, and tin foil. We first started by covering the whole interior of the larger shoe box with tin foil to allow the sunlight to reflect onto the copper tube. We then put one water bottle inside a smaller shoe box and filled the empty space with magazine papers to act as insulation to trap more heat. We then cut a hole in the bottom of the box so the water could go into the tubes. We wound the copper tube in an "S" shape going through the larger shoe box. The copper tube acted as a conductor since it absorbed the radiation through the copper and heated the water. Next, we attached the copper tube to the plastic tube by sliding it into the plastic one, and taping it to assure there was no leaking. The plastic tube emptied into a beaker at the end. Our last step was to cover the whole larger box with plastic wrap to help trap and keep the heat inside, which created a greenhouse affect. We had the large box sitting on a chair at at 68 degree angle to capture the most sunlight, while I was on the ground catching the water in the beakers, Ben was holding up the smaller box at the top, Olivia was pouring the water, and Anthony was transferring the beakers between Olivia and I. Because of this setup, the water flowed quickly downwards which allowed us to gain the most amount of heat possible.
How it Works:
1. We pour 900 mL of water into the water bottle at the top of the device.
2. The water flows through the copper tubing and gains heat from the reflection, conduction, insulation, and radiation (as mentioned above).
3. The water goes into the plastic tube.
4. The water empties into the beaker at the end.
5. We continuously transfer the two beakers as they fill up.
We continued this cycle for 30 minutes. We only lost 100 mL of water, so we ended up with 800 mL at the end, which was a lot compared to most groups. Our starting temperature was 17°C and our end temperature was 20°C. This resulted in a heat gain of 11,302.2 J.
3. Solar Angles and How it Changes During Seasons
For this next part of the project, we learned about the angles of the sun and how they change throughout the year with the different seasons.
~vertical light- the brightest and most concentrated which results in more light/heat per unit area
~slanted light- more spread out light, so therefore it is less concentrated and less brightness/heat per unit area
~the hemisphere tilted towards the sun gets more vertical light (summer)
~the hemisphere tilted away from the sun gets more slanted light (winter)
~the latitudes near the equator always get more vertical light
~the latitudes far away from the equator always get slanted light
~this is all due to the curvature of the spherical Earth
4. Daylighting Design Activity
In this section, we learned about different ways to obtain light into a house without using electricity. We focused on a few main devices, which were skylights, clerestory windows, solar tubes, and light shelves.

solar tube
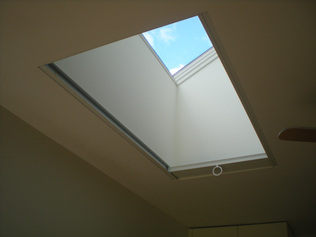
skylight
|
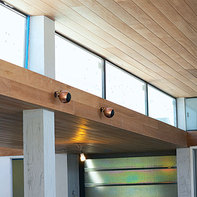
clerestory windows
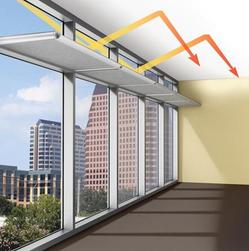
light shelves
|
skylights - a window cut into the roof that allows light to travel inside the building
light shelf - a window sill that reflects incoming sun rays onto the ceiling and then into the room
solar tube - a highly reflective tube that brings daylight into a home by bouncing the light through the tube
clerestory window - a window placed close to the ceiling on the walls, used to bring slanted light into the room
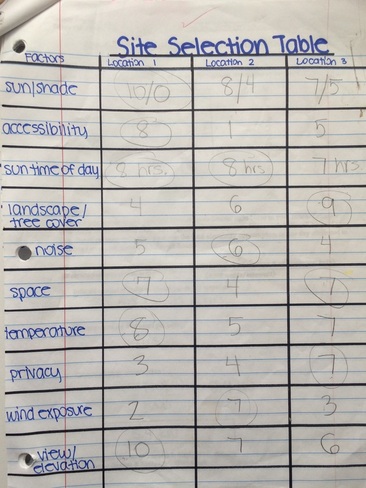
5. Site Selection
For this aspect, we got to walk around the San Marin campus to decide on the best place to build our structure. We chose three locations and rated them on a scale of 1-10. We took into account sun/shade, accessibility, amount of sunlight you get in the day, landscape/tree cover, noise, space, temperature, privacy, wind exposure, and view/elevation. We ended up choosing site 1, which is located on the hill behind the track and next to the parking lot. Below is the table I made to record our data:
light shelf - a window sill that reflects incoming sun rays onto the ceiling and then into the room
solar tube - a highly reflective tube that brings daylight into a home by bouncing the light through the tube
clerestory window - a window placed close to the ceiling on the walls, used to bring slanted light into the room
5. Site Selection
For this aspect, we got to walk around the San Marin campus to decide on the best place to build our structure. We chose three locations and rated them on a scale of 1-10. We took into account sun/shade, accessibility, amount of sunlight you get in the day, landscape/tree cover, noise, space, temperature, privacy, wind exposure, and view/elevation. We ended up choosing site 1, which is located on the hill behind the track and next to the parking lot. Below is the table I made to record our data:
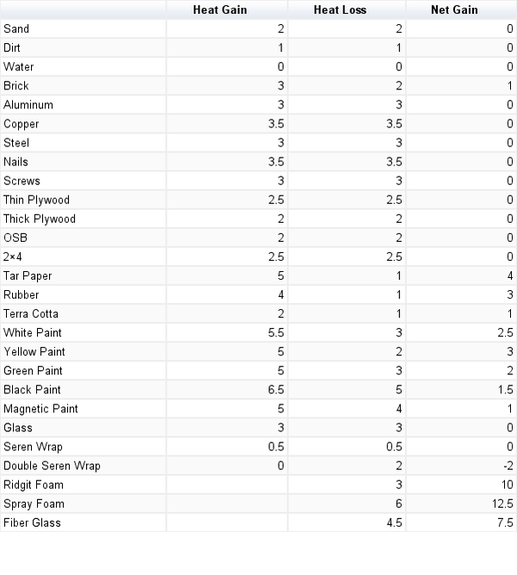
6. Materials Testing Lab
This part of the project was definitely one of the most challenging aspects. As a class, we designed a materials testing lab. Our objective was to find out the most effective building materials that were good insulators, conductors, and absorbed/sustained heat the best. The materials we decided to test were:
conducting- copper, aluminum, steel, nails, screws, OSB, thin and thick plywood, 2x4
insulating- rigid foam, spray foam, fiberglass
absorb/hold-water, sand, tar paper, terra cotta, rubber, plastic wrap, glass, dirt, brick, magnetic/black/yellow/green/white paint, plastic wrap (double)
Below is our data table that we made after conducting our experiment:
Procedure:
1. Place tested material on corrugated cardboard to insulate them from the cool counter top.
2. Place 1 foot squared of tested material 12 centimeters below a 60W incandescent bulb.
3. Take the initial temperature of tested material.
4. Turn on the light bulb.
5. Take/record the temperature every 5 minutes for 20 minutes total.
6. Turn off the light bulb.
7. Take/record the temperature every 5 minutes for a total for 20 minutes.
8. Find the total temperature gain and total temperature loss for each of the materials.
9. Compare the different materials and analyze data.
7. Building Design
All of our previous small projects all led up to this major one. Our assignment was to build a solar reflector that would get light into the Northern window of STEM's Solar Studio. We also had to build a cold frame that would be built in San Marin's garden. The purpose of this cold frame is to make plant growth possible in the cold winters. We were required to include key features, a materials list, budget, blueprints, and a scale model of our designs. Below are the presentations my group made for the solar reflector and the cold frame:
8. Justification
Many people may be wondering why we are building a house only relying on solar power. This part of our project explains why. Our class did research about all kinds of different energy sources, and we made a table including the pros and cons of each and how they work. Additionally, we talked about climate change, the greenhouse effect on Earth, and the cost of electricity.
9. Generation of Electricity
For this final part of our project, we were told to make two different kinds of wind turbines. One had to be a vertical wind axis turbine (VAWT), and the other was a horizontal axis wind turbine (HAWT). Before constructing them, we did a little research on each type and brainstormed some ideas. We ended up building both of our turbines using small sticks and manila folders. We took three trials for low, medium, and high speeds, used a device that calculated voltage, and recorded those numbers in a data table. We then took the averages of the trials for each speed and compared. Based on the data we found, we concluded that the HAWT worked more efficiently than a VAWT, so that is the device we would recommend you to use for your home.
Reflection
This project was definitely one of the most challenging and most informational projects I have had all year! There were many ups and only a few downs of this project. One peak we had was our great leadership in the group. We all took on different aspects of the project and finished them completely and accurately. It was nice to be able to have that trust in your group members to be able to get their part of the project done. Another peak we had was communicating all of our different ideas! We all had a variety of great, unique ideas, and that really helped to create the best models/devices/presentations that we could. We were very good at communicating these ideas and it assured that everyone was always on the same page while we were working. A pit that our group had was the distribution of work. I feel that some people took on a lot more challenging tasks while others only got a few easier ones. In the future, I think it would be a good idea to make sure the work loads were more equal, so certain group members weren't so overwhelmed. Another pit we encountered was that we were easily distracted. There were often times where at least one group member was walking around the classroom or talking with other people in the class. Of course it is always a good idea to share and discuss ideas and progress with other classmates, but next time I want to make sure we are staying on task. A skill that I learned about myself is that I am a good leader. Before this project, I would not have thought of myself as the kind of person to take the initiative to help lead others. I am very glad that this project brought that quality out in me, because I think it is an essential life skill to have. Another thing I learned about myself is that I am a good mediator. Occasionally, there would be a small argument between other group members, and I would often find myself helping to resolve the issue and help to get all of us working cooperatively again. Later on in the collaboration rubrics, the people in my group told me they really appreciated me helping out once in a while. Something that I think I could improve on is managing my time. I would often find myself rushing at the end of an assignment to get it done. I have improved since the beginning of the year, but I would definitely want to work on it more in the future. Another thing I need to work on is stress management. There were many occasions where I would be very overwhelmed and stressed when I didn't have to be. In the future, I will make sure to ask for a little help once in a while if I feel like I am taking on too much at one time. Overall, this was a very amazing learning experience for me. I learned many important life skills and qualities about myself that I didn't know I had. I also know what I can improve on in upcoming projects, which is very helpful. I am very thankful for this whole experience, and it will remain one of the most informational projects I have done to date.
